0x00
2017年3月30日23:00:15 被左老师钦定在课上讲交叉编译,这里记录下过程,方便自己以后查阅,也方便同学们当做一个参考吧。 PS: 这个是针对一般情况下的编译,针对7688板子的编译参考另一片文章。
如果遇到了任何问题,一定一定一定要看最后面refer的那边官方文档。
0x01
- 首先配置环境,我选择的是现在我的Ubuntu 16.04的系统上做实验。
1
2
3
~  23:03:34
$ uname -a
Linux Cyber 4.4.0-66-generic #87-Ubuntu SMP Fri Mar 3 15:29:05 UTC 2017 x86_64 x86_64 x86_64 GNU/Linux
首先在github上下载源代码,一般的Linux系统都会带有git, 如果没有,运行
1
$ sudo apt install git
稍等片刻即可装好,继续之前下载源代码的过程。源代码目前仍在不断的更新中,github的地址在这里, 装好git之后运行下面的命令即可将源代码保存到本地。
1
2
3
4
5
6
7
8
9
$ git clone --depth=1 https://github.com/openwrt/openwrt.git
Cloning into 'openwrt'...
remote: Counting objects: 8407, done.
remote: Compressing objects: 100% (7153/7153), done.
remote: Total 8407 (delta 1313), reused 5976 (delta 633), pack-reused 0
Receiving objects: 100% (8407/8407), 9.63 MiB | 143.00 KiB/s, done.
Resolving deltas: 100% (1313/1313), done.
Checking connectivity... done.
$ cd openwrt
这里加–depth=1的原因是我们只关心他现在的代码,对以前修改过的记录不感兴趣,所以我们只需要保存他最后一次推送的代码,但是这个代码是正在开发中的,所以可能存在潜在未修复的问题,保险的话可以用发行版,最新稳定版本是15年9月份发布的,地址在这里 如果不想使用更新中的代码,那么可以选择发布版的代码。
1
2
3
4
5
6
7
8
9
10
11
12
13
14
15
16
17
18
19
20
21
22
23
24
$ wget https://github.com/openwrt/openwrt/archive/v15.05.tar.gz
$ tar -xzf v15.05.tar.gz
$ cd openwrt-15.05
$ ls -al
total 100
drwxrwxr-x 10 ubuntu ubuntu  4096 Sep  2  2015 .
drwxrwxr-x 15 ubuntu ubuntu  4096 Mar 30 23:17 ..
-rw-rw-r--  1 ubuntu ubuntu   179 Sep  2  2015 BSDmakefile
drwxrwxr-x  2 ubuntu ubuntu  4096 Sep  2  2015 config
-rw-rw-r--  1 ubuntu ubuntu   576 Sep  2  2015 Config.in
drwxrwxr-x  2 ubuntu ubuntu  4096 Sep  2  2015 docs
-rw-rw-r--  1 ubuntu ubuntu   904 Sep  2  2015 feeds.conf.default
-rw-rw-r--  1 ubuntu ubuntu     8 Sep  2  2015 .gitattributes
-rw-rw-r--  1 ubuntu ubuntu   224 Sep  2  2015 .gitignore
drwxrwxr-x  3 ubuntu ubuntu  4096 Sep  2  2015 include
-rw-rw-r--  1 ubuntu ubuntu 17992 Sep  2  2015 LICENSE
-rw-rw-r--  1 ubuntu ubuntu  2659 Sep  2  2015 Makefile
drwxrwxr-x 11 ubuntu ubuntu  4096 Sep  2  2015 package
-rw-rw-r--  1 ubuntu ubuntu  1272 Sep  2  2015 README
-rw-rw-r--  1 ubuntu ubuntu 10680 Sep  2  2015 rules.mk
drwxrwxr-x  4 ubuntu ubuntu  4096 Sep  2  2015 scripts
drwxrwxr-x  6 ubuntu ubuntu  4096 Sep  2  2015 target
drwxrwxr-x 11 ubuntu ubuntu  4096 Sep  2  2015 toolchain
drwxrwxr-x 53 ubuntu ubuntu  4096 Sep  2  2015 tools
大概看一下他的文件构成,在开源的世界里面,最最重要的东西就是 README了,他连接着你的每一个问题的答案。
1
2
3
4
5
6
7
8
9
10
11
12
13
14
15
16
17
18
19
20
21
22
23
24
25
26
27
28
29
30
31
32
33
$ cat README
This is the buildsystem for the OpenWrt Linux distribution.

Please use "make menuconfig" to configure your appreciated
configuration for the toolchain and firmware.

You need to have installed gcc, binutils, bzip2, flex, python, perl, make,
find, grep, diff, unzip, gawk, getopt, subversion, libz-dev and libc headers.

Run "./scripts/feeds update -a" to get all the latest package definitions
defined in feeds.conf / feeds.conf.default respectively
and "./scripts/feeds install -a" to install symlinks of all of them into
package/feeds/.

Use "make menuconfig" to configure your image.

Simply running "make" will build your firmware.
It will download all sources, build the cross-compile toolchain,
the kernel and all choosen applications.

You can use "scripts/flashing/flash.sh" for remotely updating your embedded
system via tftp.

The OpenWrt system is documented in docs/. You will need a LaTeX distribution
and the tex4ht package to build the documentation. Type "make -C docs/" to build it.

To build your own firmware you need to have access to a Linux, BSD or MacOSX system
(case-sensitive filesystem required). Cygwin will not be supported because of
the lack of case sensitiveness in the file system.
Sunshine!
	Your OpenWrt Project
	http://openwrt.org
他提到需要
1
2
You need to have installed gcc, binutils, bzip2, flex, python, perl, make,
find, grep, diff, unzip, gawk, getopt, subversion, libz-dev
安装上述软件:
1
$ sudo apt-get install gcc g++ binutils patch bzip2 flex bison make autoconf gettext texinfo unzip sharutils subversion libncurses5-dev ncurses-term zlib1g-dev gawk -y
同时更新一下 feeds, 这个记录着软件源的地址。
1
2
$ ./scripts/feeds update -a
$ ./scripts/feeds install -a
0x03
下面开始编译过程:
1
$ make menuconfig
会出现如下所示图片:
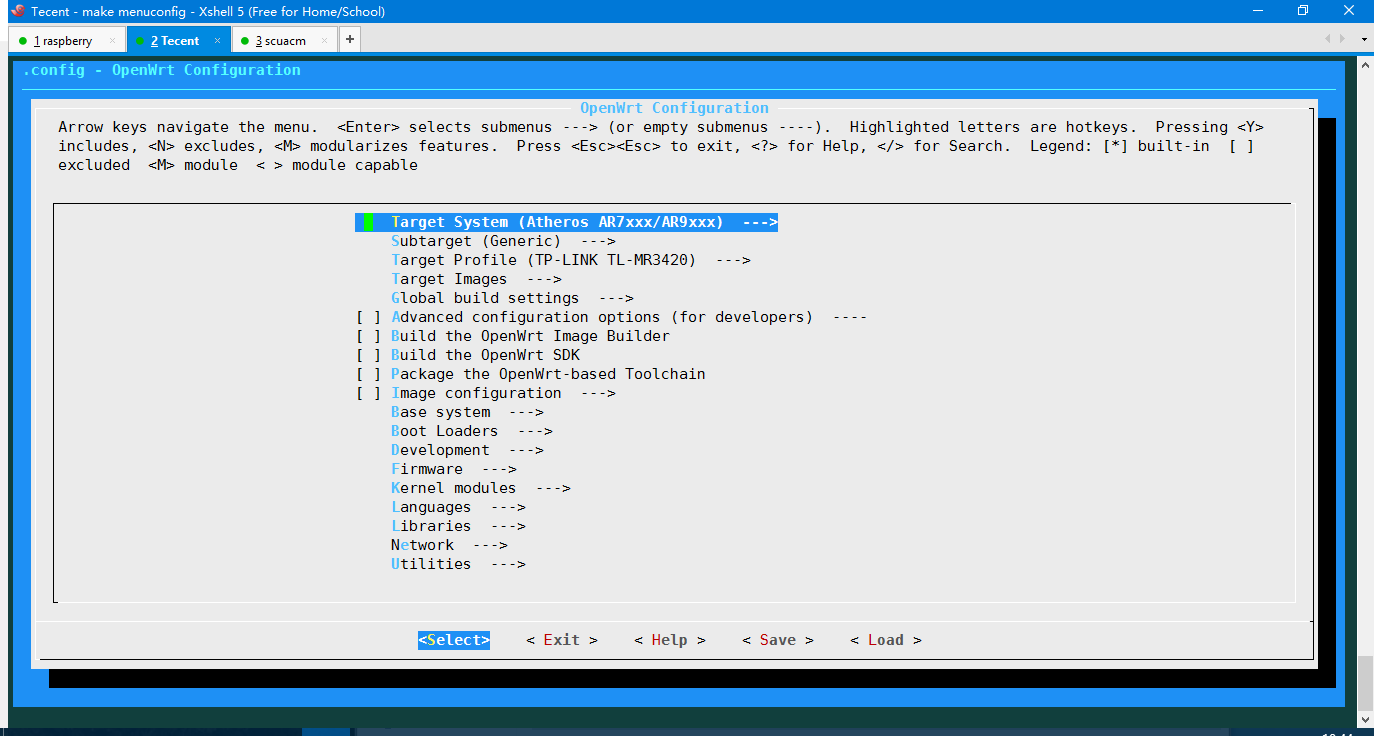 带有图形界面,方便食用,通过键盘操作光标,字母选择选项, y表示选择该项, 方向键移动光标位置。
配置好之后,选项如图所示,重点在前三个选项。
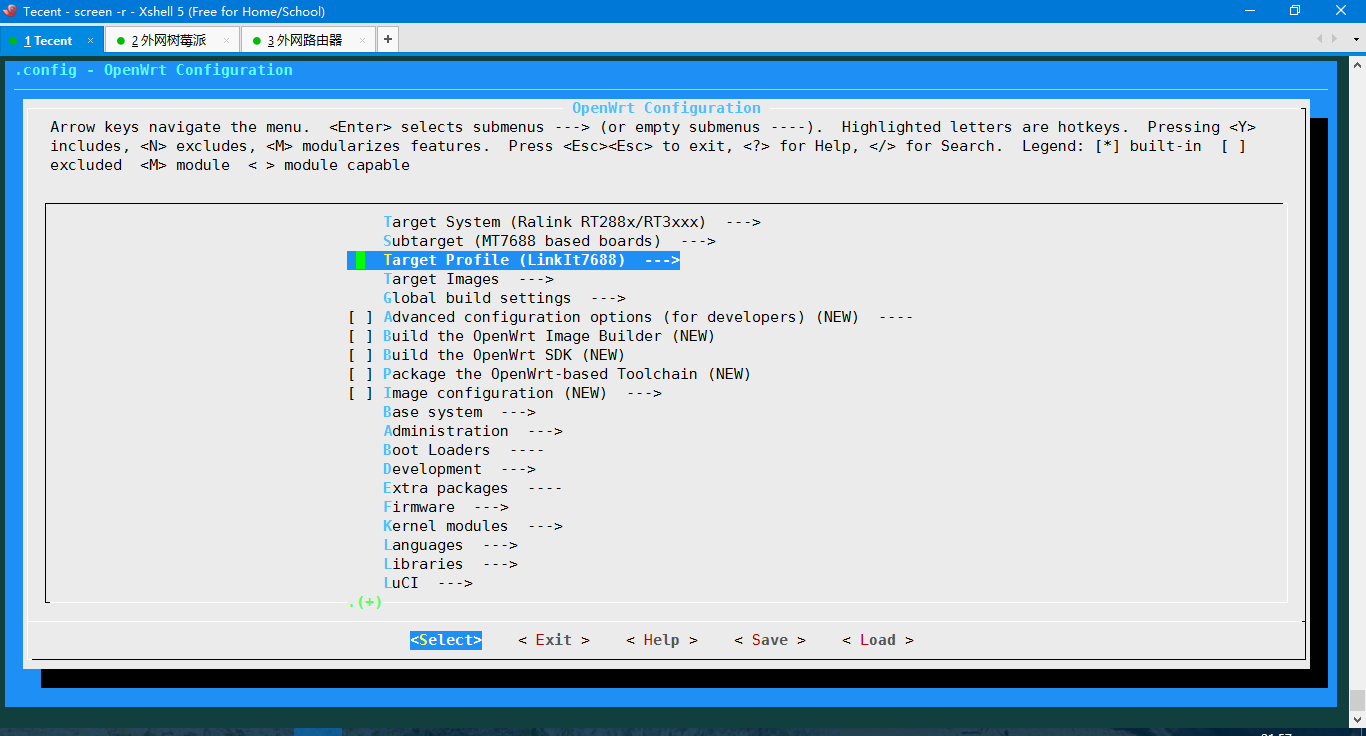
带有图形界面,方便食用,通过键盘操作光标,字母选择选项, y表示选择该项, 方向键移动光标位置。
配置好之后,选项如图所示,重点在前三个选项。
选择到这里之后,基本就差不多了,就等着后面踩坑了。为了防止编译过程中远程连接断开,建议开一个 screen用来保持会话(当然tmux更好用啦,入手要点时间,这里就不说了)。 如果连接断了,重新登录,输入screen -d -r make_openwrt即可恢复之前的会话,这样不会中断编译的过程。
1
2
$ screen -S make_openwrt
$ make -j$(nproc)
j后面的参数取决于CPU的核心数,值得注意的是,尽管开了多线程,并不一定会一直占满CPU时间,因为编译过程中有些地方是有前驱关系的,有些地方依赖于之前编译好的部分,所以可能有时候CPU只会占用少量,负载也不会太高。另外过程中会下载软件包,这个时候取决于网络IO速率, CPU也不会占用太多。
0x04
刷系统部分参考另外一篇。